Today's craft is all about the scrubs! Sugar scrubs, that is. ;) And three different kinds, to be exact.
This is probably one of the easiest and fastest gifts you could make for someone, and the possibilities are endless!
Here are the ingredients we used for the first two:
White sugar
Baby oil
Essential oil
The first two we made were with plain old white sugar. I added about 1 cup of sugar to a bowl. We then measured out 1/4 cup baby oil. This is the only oil I had on hand, so that is what I used. Olive oil, coconut oil, or avocado oil would make excellent alternatives! I then added about 15 drops of essential oil. We did one peppermint, and one grapefruit. They smell delicious!!
I used separate bowls and spatulas for each one so that I did not have to wash in between. I was on the phone, and it was just easier to grab another bowl! I was done with each one in less than 5 minutes!
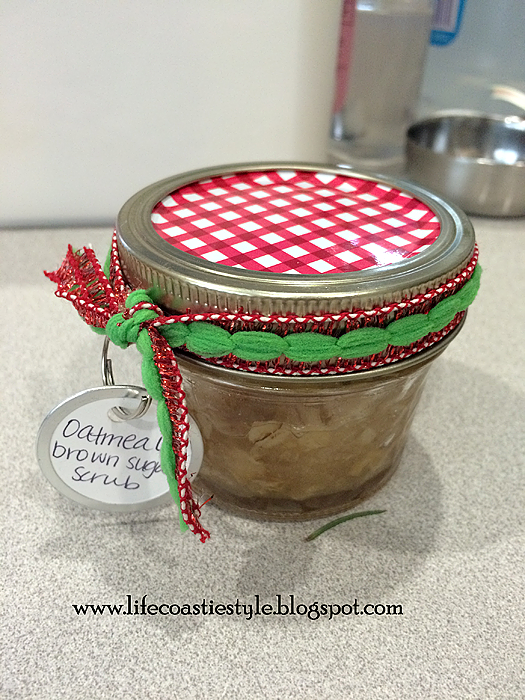
Each scrub got put into a little jar with some Christmas colored ribbon and a tag. :)
The brown sugar scrub was a little more involved than that!
The ingredients were:
1 1/2 C Sugar
1/4 Cup Honey
1/4 Cup baby oil
1/2 Cup Oats
As you can see, this one has more to it. I was able to divide this recipe into 3 jars. Small size mason jars. This means in less than 5 minutes, I made 3 gifts! :) The jars got ribboned and tagged like the first ones, and they were ready to go!!
I have no idea why I didn't get a photo of all three jars together. I really thought I did since they all looked so pretty...
And, of course, I had to make some for myself! You will want to, also! Your hands will thank you!!
Tomorrow I will be showing you how they got packaged along with out gifts that had to be shipped out! I can't wait. I'm very excited to share! You should be, too! ;)
Head over to Facebook for a sneak peek!
If you would like to know more about Young Living Essential oils, or purchase any, you can view the website HERE My Member number is 2322868 :D
You can also feel free to message me about any information you would like! :)
Showing posts with label crafts. Show all posts
Thursday, December 18, 2014
Wednesday, December 10, 2014
12 Days of Christmas Crafts | Day 6 | Pillow Covers
Today's post actually comes from a couple weeks ago. I took a trip to IKEA. I really really love that place!! I found these great pillow covers for only $6! I couldn't decide which one I wanted more, so I got one of each. I don't have enough pillows in their size to get two of each. Our living room couch has 6 pillows on it, 2 of each size. I had the middle size covered, so I needed to find something for the others. I ended up going to JoAnn Fabrics a few days later on a mission. I wanted something Christmas-y, but I didn't want Christmas Trees and Presents and such. I also wanted a heavier fabric than all the holiday prints offered. Our living room is very neutral, so I wanted to bring in some seasonal color. I ended up finding a solid marigold color and a green printed fabric that I love.
I usually make envelope-style pillow covers, but I found a bunch of zippers in my stash that I decided to use this time! They were the perfect size! I even love how the colors compliment the fabric, but aren't the same color (or just plain white!) There was no method to these covers. I laid my pillow on top of the piece of fabric, added about an inch, cut it, and sewed it shut. I wanted something quick and easy, and that is how I accomplished it! I don't always have time for pre-planning and measuring and pinning and such!
Here's how they all look on the couch! What do you think??
I am very pleased with how they all turned out. I love walking into the room to see the bright colors. It's even better to know that I MADE it! (Except the two from IKEA, of course!)
This guy is sure enjoying them! :)
I have no idea what we will be crafting tomorrow, so be sure to check back!! :)
Find me everywhere!
Facebook
Instagram
I usually make envelope-style pillow covers, but I found a bunch of zippers in my stash that I decided to use this time! They were the perfect size! I even love how the colors compliment the fabric, but aren't the same color (or just plain white!) There was no method to these covers. I laid my pillow on top of the piece of fabric, added about an inch, cut it, and sewed it shut. I wanted something quick and easy, and that is how I accomplished it! I don't always have time for pre-planning and measuring and pinning and such!
Here's how they all look on the couch! What do you think??
I am very pleased with how they all turned out. I love walking into the room to see the bright colors. It's even better to know that I MADE it! (Except the two from IKEA, of course!)
This guy is sure enjoying them! :)
I have no idea what we will be crafting tomorrow, so be sure to check back!! :)
Find me everywhere!
Tuesday, December 9, 2014
12 Days of Christmas Crafts | Day 5 | Christmas Cards | Addie Lynn
Today we are doing a special kind of craft. Tomorrow is my husband's birthday, so I planned on helping K make him a card. Then I came across THIS post in my Facebook feed from the Today show. Breaks my heart. So we decided to make an extra card to send to Miss Addie Lynn and her sisters for Christmas.
I just grabbed some cardstock, photo tape, and Christmas stickers.
I love this stuff. I only use it for special occasions because I'm afraid I'm going ot run out and not be able to get more! :)
I took a piece of patterned cardstock and taped a plain piece on the inside so we would have somewhere to write.
Then we decorated the outside with stickers, and wrote a message inside.
I even decorated the outside of the envelope, because who likes a plain envelope?? ;)
And there it is...a fun handmade Christmas card on its way to Addie Lynn and her sisters!!
If you have time to make a card, or even just mail an extra, you can send one to Addie, too!!
Here is her address:
Addie Lynn and Sisters, P.O. Box 162, Fountain Green, UT 84632
You can also donate to her medical bills HERE and visit Addie's Facebook page HERE!
Now I must get a move on our other Christmas cards!!
Find me on Facebook!
Have a question? Send me a message!! kajpics@yahoo.com :D
I just grabbed some cardstock, photo tape, and Christmas stickers.
I love this stuff. I only use it for special occasions because I'm afraid I'm going ot run out and not be able to get more! :)
I took a piece of patterned cardstock and taped a plain piece on the inside so we would have somewhere to write.
Then we decorated the outside with stickers, and wrote a message inside.
I even decorated the outside of the envelope, because who likes a plain envelope?? ;)
And there it is...a fun handmade Christmas card on its way to Addie Lynn and her sisters!!
If you have time to make a card, or even just mail an extra, you can send one to Addie, too!!
Here is her address:
Addie Lynn and Sisters, P.O. Box 162, Fountain Green, UT 84632
You can also donate to her medical bills HERE and visit Addie's Facebook page HERE!
Now I must get a move on our other Christmas cards!!
Find me on Facebook!
Have a question? Send me a message!! kajpics
Friday, December 5, 2014
12 Days of Christmas Crafts | Day 4 | Popsicle Snowflakes
Today's craft does not include a lot of photos, unfortunately. There are two reasons for this: 1. It went so fast. 2. L decided he REALLY wanted to help and kept sticking his cute little chubby hands in every photo! :) (See below!)
I do have enough that you can get the general idea, though!
Here are the supplies we used:
Popsicle sticks (K chose blue because we had them in the stash, but you could obviously use any color!)
Those awesome double sided sticky dots from yesterday's craft
MORE buttons!!
That's all!
We started by using the sticky dots to build the snowflake.
K then chose which buttons he wanted to use, and we added the sticky dots to the back and stuck it on a popsicle stick. We did this until he was satisfied with the results, and added a huge one to the center at the end!
This craft took less than 10 minutes! The perks of not having to wait for glue to dry!! ;)
I am probably going to add some string to this so we can hang it on our tree! :)
Tomorrow I have a very special craft to share, so be sure to check back!! :D
Thursday, December 4, 2014
12 Days of Christmas Crafts | Day 3 | Toilet Paper Roll Reindeer and Tree
HI!
Today we are using up some toilet paper rolls I had saved for a Thanksgiving craft we never got to!!
For the first one, we made a cute little reindeer!
Here are the supplies we used: (I didn't get them all in the photo!)
A tp roll
fuzzy pompoms (red)
two small black buttons from my stash
textured brown cardstock
Kyle's hand
scissors
pencil
tape
double sided sticky dots
black marker
I first traced both of K's hands onto the cardstock and cut them out.
Then we taped them to the back side of the roll.
K picked a red pompom for the reindeer nose. He wanted it to be like Rudolph. I used a double sided sticky dot to add the nose and eyes. I didn't feel like being patient enough for glue to dry!
To finish it off, K drew a mouth on Rudolph. He said he wanted it to look like he was saying hi! I think he accomplished that! Haha
The second one we made was a Christmas tree. I used a piece of green cardstock, and cut out a (not perfect) triangle shape. Then I fringed the edges.
The button stash!
After that. I let K go to town with 'decorating' the tree. He decided to add all the buttons in a straight line. I used the double sided sticky dots again to adhere the buttons to the paper. L even tried to get in on the action!
All done!! He topped it off with a yellow pompom 'star'.
I used some more sticky dots to stick it to the tp roll, and because I cut the tree little tall, I had to use a popsicle stick to secure it in the back so it wouldn't fall over!
Tomorrow we will be making snowflake ornaments with popsicle sticks!!
Wednesday, December 3, 2014
12 Days of Christmas Crafts | Day 2 | Coffee Filter Snowflakes
Welcome to day 2!!
Today we made coffee filter snowflakes. I've had a stack of coffee filters hanging around for a while. We own a Keurig, but, we had a drip coffee maker for our camper. We got rid of that coffee maker when we moved , so I really had no use for the filters. I decided they needed to be put to good use!
I'm sure you have seen the gazillion tutorials for different versions of these on Pinterest. If not, you're in the right place!! :)
This craft was kid-friendly enough for my almost 4 year old. He really enjoyed cutting all the shapes. I didn't get a picture of our supplies, but we used:
Plain scissors
Decorative scissors
Hole Punch
Markers
Spray bottle with water
Tape
And, of course, coffee filters.
I folded each filter in half 3 times, so it looked like a piece of pizza when I was done. For a couple of them, I drew shapes that Kyle could cut, but we mostly just free handed everything.
We made quite the mess!!
At the end, we decided we wanted to color a few. (This is where the markers and spray bottle come in!) We colored all over the filter with washable markers, then Kyle got to spray them with water. He really enjoyed watching all the colors run together. Once they were all dry, we cut them into snowflakes, too.
While they were drying, we hung up our white ones. They made a great decoration for our big sliding door!! (This photo was before we added the colorful ones!)
What crafts are you working on?? Feel free to share your photos over on my Facebook page!!
Tuesday, December 2, 2014
12 Days of Christmas Crafts | Day 1 | Painted Wine Bottles
Hey, hey! Welcome to December!
For the next bottle, I painted it white, and just sprinkled the tinsel glitter all over, heavier at the bottom, and lighter at the top. I originally had a different idea for this one, but I was happy with the simplicity of it. I may add a glitter snowflake once we open our ornament box. I'll add an updated photo if I do. :)
In an effort to get back into my crafting, I have decided to do a 12 days of Christmas crafts! They may not all be specifically Christmas related, but at least winter-y. Most will even be kid-friendly since I will be doing them with at least one of my boys. :)
I have been pondering painting wine bottles for a while now, but I never had a good idea of what I wanted for our home. I saw some really great ones on Pinterest, but A. I wanted ours a little more original, and B. They just didn't "fit" with what I wanted. This morning, I was rummaging through my craft box, and came across some Martha Stewart tinsel glitter and Pearl Ex powder pigments that I have had for a while and have never used! I thought they would be perfect!
I gathered all the supplies I wanted...
Then got to work removing wine bottle labels, and painting them all white.
For the first bottle, I poured a little of the pigment powder into the lid so I didn't have a load dump onto my bottle! Then I sprinkled it all around. I really loved how it fell onto the bottle. I sed these two colors, and layered them until I was satisfied. I ended up doing two bottles this way.
These are the two colors I chose...
Here they are drying on my sink, out of the reach of the littles! I will be finishing the tinsel glitter one by adding a layer of mod podge for protection. For the powdered ones I will spray them with a clear sealant. We don't want glitter or powder all over the house, do we??
once that was all done, I added some leftover clippings from our tree and put them on the ledge at our entry way. I will be adding more to the entry way in the next few days! I can't wait to share my post on how we decorate our house this year!
There you have it. A super easy craft. I didn't have my son help with this one, but you could definitely have a little one pour on some glitter or help with the painting if you are brave enough! All three bottles took me less than an hour (during nap time!) to complete! I would love to see your versions if you decide to paint any bottles this season!
Stay tuned! Tomorrow I will be sharing a kid-friendly snowflake craft! :)
Monday, March 10, 2014
One more time...
I have had such a hard time trying to keep up posting over the last year. Being pregnant really kicked my butt. I was exhausted. We also didn't have much going on, so there wasn't much to blog about. Now that my little guy is two months old, we are getting back into a new routine, and I am able to have a little more time. A little. I miss being able to share my food and crafts. It kept me creative!
There are many things I am looking forward to blogging about in the near future. They include:
* the burlap table runners I made!
* all the random things I have made to coordinate
* my spring/summer wreath
* our house redecoration
* my new scrap booking project
* my new fitness routine
* and the baby, of course!
These are just a few of the things I am looking forward to sharing! I hope you will stay tuned, check back often, and help me make sure I don't get behind again! I think since I wrote it down to share with the public, it may keep me a little more motivated! Haha.
For now, though, I must go finish giving baths for bed!
Here is a little peek at what it's been like here lately! I can't wait for the spring!
Wednesday, April 3, 2013
Making a fire!
We love to go camping in the summer! Every year, we try to go as often as possible! Our season usually starts in late April-May, but this year we get to go early! In fact, by the time you read this, we will be on our way home from our first 2013 camping trip!
One problem we had come up quite a bit last year was getting the fire started (in a timely manner!) It was usually because the wood we got was wet. Because we travel out of state, and because there is a big bug issue up here, we are not allowed to bring our own weeod. This means we just get to deal with whatever the campground has or what we cam find around our site.
Last year, my friend told me about these fire starters she found on Pinterest. I do not have the exact link that she used, so I decided to make my own. I have all these random half empty jars of candles floating around the house. I usually keep a jar on the stove,a nd forget to move it when I tuen the oven on, so the whole thing melts and the wax falls in :/ You would think by now I would have learned to move the candle before turning on the oven, but no. It is onyl after I start smelling the candle that I realzie why I am smelling it!
Anyways....I gathered these jars and started saving the wax when I would change my Scentsy smells. I also added broken pieces of candles and tarts. I started saving my dryer lint in an empty spaghetti sauce jar. Since it was winter, I figured I would have plenty of time to save before I needed them. The last ingredient I needed was shredded paper. We have a shredder that always has something in it, so this was the easiest part. Of course, when I needed it, I realized my husband had just emptied the shredder! I just grabbed some junk mail and and newspaper and shredded it up real quick. I was sure to not use any of the slick pieces of paper, just newspaper type.
I am very excited to use these. They make the fire smell awesome, too! Just imageine all your favorite candles rolled in to one! I love it!
One problem we had come up quite a bit last year was getting the fire started (in a timely manner!) It was usually because the wood we got was wet. Because we travel out of state, and because there is a big bug issue up here, we are not allowed to bring our own weeod. This means we just get to deal with whatever the campground has or what we cam find around our site.
Last year, my friend told me about these fire starters she found on Pinterest. I do not have the exact link that she used, so I decided to make my own. I have all these random half empty jars of candles floating around the house. I usually keep a jar on the stove,a nd forget to move it when I tuen the oven on, so the whole thing melts and the wax falls in :/ You would think by now I would have learned to move the candle before turning on the oven, but no. It is onyl after I start smelling the candle that I realzie why I am smelling it!
Anyways....I gathered these jars and started saving the wax when I would change my Scentsy smells. I also added broken pieces of candles and tarts. I started saving my dryer lint in an empty spaghetti sauce jar. Since it was winter, I figured I would have plenty of time to save before I needed them. The last ingredient I needed was shredded paper. We have a shredder that always has something in it, so this was the easiest part. Of course, when I needed it, I realized my husband had just emptied the shredder! I just grabbed some junk mail and and newspaper and shredded it up real quick. I was sure to not use any of the slick pieces of paper, just newspaper type.
First, I got a pot of water boiling to melt the wax. Add enough water to cover the wax level, but not the jar.
Then, I put the jar in the water so it could start melting while I prepped the rest. Isn't it pretty?
I grabbed a muffin tin and added some paper liners. I have an abundance of these, so I doubled up for extra holding power. I also thought it might help light better later.
I added a good layer of lint first.
Then I added some shredded paper. It is okayif it looks like too much. Once the wax goes in, it will help the pile go down.
Finally, once the wax started to melt, I began pouring it into the liners. (Use a hot pad, the jar is hot!)
I filled them to about 3/4 full.
And voila! Fire starter cupcakes!
I am very excited to use these. They make the fire smell awesome, too! Just imageine all your favorite candles rolled in to one! I love it!
Be sure to check back for the recap of our first camping trip of the year!! I am SO Excited!!!
Did you figure out what J made for his scratch art photo??