Showing posts with label decorating. Show all posts

Thursday, September 17, 2015

Fall Decor & Buffet Makeover

              I am so excited to share this post today! I have been wanting a buffet for a while now. I could just never find one that I liked, or justify the cost of the ones I did like. I recently found someone selling this buffet on a local sale site, and thought it would be the perfect project! I forgot to get a before picture before we started pulling the knobs and doors off. Luckily, I was able to grab these screenshots of the sale post!


               The seller had already refinished this piece with a gray chalk paint. Thankfully, it was never sealed, so that saved me a lot of work! I had an idea of what I wanted the finished product to look like. I couldn't find the color of chalk paint that I wanted, but after a very helpful associate at Lowes, I learned that I could paint right over the existing chalk paint with regular interior paint, and as long as I sealed it, there would be no problems! That opened up a whole world of color options!!

                I ended up finding the perfect color in the Sherwin Williams HGTV Home line. It's called Amelia's Wings. I may have been a *little* biased towards this color since our new little baby girl is named Amelia. But- it is the exact color I had in mind, so it worked out great!
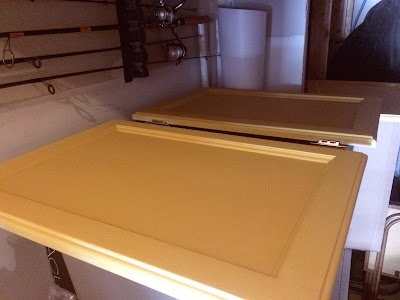
I got right to work painting the first coat on!

               For the top, I used Valspar's Dark Earth. I love how perfectly it compliments the bottom.


                I finished it off with some matching knobs. Finding the perfect ones were almost as hard as choosing a paint color!!

I am so in love with how this turned out. I think for my first makeover project, it was a success! I can't wait to do another!


 I found this chalkboard easel at WalMart, and the quote on Pinterest. The leaf and little pumpkin came from the dollar store!

 My husband made this awesome little wood box for me (Yay for scrap wood!!) It hold just the right amount of seasonal décor, and I'm really looking forward to using it throughout the year!

The filler in the basket is a mix of items from Hobby Lobby and Michael's
This glittery pumpkin is from the dollar store also. The vase in the back is a duplicate one that I got flowers in. I just spray painted it white. The wheat décor is from Hobby Lobby.

Thursday, September 10, 2015

Happy Fall Y'all!!

Man, have I been gone long or what??
Life has been so busy lately...3 kids, another on the way (she's here now!) end of school, summer, me starting school, and having a newborn will really leave you with no blogging time! But I found a few minutes today, and I want to share some of my Fall setup with you!
Fall is my most favorite time of year. I love the weather, the comfy clothes (leggings are my favorite!) everything pumpkin, apple picking, baking...I could go on and on...
This week I slowly started bringing out my fall decorations, and realized I don't really have too many. Just loads of pumpkins. We need to work on that! So far, I think this is my favorite little corner in the house.


I scored this chair for $10 on a resale site here! I was so excited. I found this cute little pumpkin pillow on Amazon that sits perfectly on it. (I love Amazon!) The FALL blocks, I have had for a few years, and I don't remember where they came from.
I will be updating with more fall home photos as I get it done, but I just couldn't wait to share this today! I also have my first furniture remodel to share with you! Be sure to check back for those updates!

Happy Fall!

Tuesday, December 2, 2014

12 Days of Christmas Crafts | Day 1 | Painted Wine Bottles

Hey, hey! Welcome to December!
In an effort to get back into my crafting, I have decided to do a 12 days of Christmas crafts! They may not all be specifically Christmas related, but at least winter-y. Most will even be kid-friendly since I will be doing them with at least one of my boys. :)

I have been pondering painting wine bottles for a while now, but I never had a good idea of what I wanted for our home. I saw some really great ones on Pinterest, but A. I wanted ours a little more original, and B. They just didn't "fit" with what I wanted. This morning, I was rummaging through my craft box, and came across some Martha Stewart tinsel glitter and Pearl Ex powder pigments that I have had for a while and have never used! I thought they would be perfect! 
I gathered all the supplies I wanted...


    Then got to work removing wine bottle labels, and painting them all white. 


For the first bottle, I poured a little of the pigment powder into the lid so I didn't have a load dump onto my bottle! Then I sprinkled it all around. I really loved how it fell onto the bottle. I sed these two colors, and layered them until I was satisfied. I ended up doing two bottles this way.
These are the two colors I chose...


For the next bottle, I painted it white, and just sprinkled the tinsel glitter all over, heavier at the bottom, and lighter at the top. I originally had a different idea for this one, but I was happy with the simplicity of it. I may add  a glitter snowflake once we open our ornament box. I'll add an updated photo if I do. :) 


Here they are drying on my sink, out of the reach of the littles! I will be finishing the tinsel glitter one by adding a layer of mod podge for protection. For the powdered ones I will spray them with a clear sealant. We don't want glitter or powder all over the house, do we??


once that was all done, I added some leftover clippings from our tree and put them on the ledge at our entry way. I will be adding more to the entry way in the next few days! I can't wait to share my post on how we decorate our house this year!


There you have it. A super easy craft. I didn't have my son help with this one, but you could definitely have a little one pour on some glitter or help with the painting if you are brave enough! All three bottles took me less than an hour (during nap time!) to complete! I would love to see your versions if you decide to paint any bottles this season!

Stay tuned! Tomorrow I will be sharing a kid-friendly snowflake craft! :)

Friday, March 29, 2013

IKEA Hacks

        Have you heard of these? I just recently had a conversation about this new trend. Now I love IKEA, but I never thought to makeover the items i have bought.
        Until I heard someone talk about these hacks...So I started to do some research. I have this table from IKEA that I bought for my little one. I wanted something that he could sit and eat or play at, that didn't take up too much space, so he could be in the kitchen with me. This table won when I saw that it came with two chairs and was only $20! I started to browse through Pinterest (there are lots of great ideas there!) and saw people were doing all kinds of makeovers to IKEA furniture! I started to get really excited!
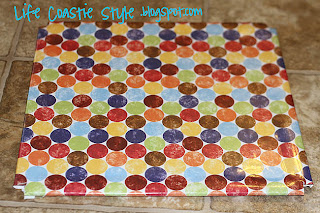
         Now, I am a very much an instant gratification kind of girl. I did not want to wait until my husband came home to help, so I got to work. I went into the garage and found out we had some paint left over from when I painted our entry way. It was blue...how perfect for a little boy! Then I found the leftover chalkboard paint from painting our chalkboard wall...even better! Finally, I wanted something fun for the chair covers. During my research, I saw many options. Since I knew my two-year-old would be eating/drinking (Spilling!) at this table, I wanted something that was somewhat water resistant...(Insert light bulb moment here) I chose contact paper!! We always have lots of it, so, once again, I didn't have to make a special trip. Instead of just using plain white (boring) contact paper, I used some clear and put a colroful piece of scrapbook paper underneath! Are you ready to see the results?
First- here is the before:


 Cute, but boring!
Here is the mess I made while refinishing!
 
And the seat with scrapbook paper and contact paper
 
Did I tell you the best part....I used chalk board paint for the top!!


And finally....the finished product!


What do you think?? I would love to see anything you have transformed from IKEA!!


Thursday, February 14, 2013

Picture Hanging and Redecorating Part 2

     I hope you found my last post about rearranging my walls helpful. I am usually one to just "eyeball" it and hope for nice level, evenly spaced things hanging on the walls. Sometimes it works out great. Somtimes I am left making more holes in the wall. I really enjoyed using the paper as a guide for these potential issues. It gave me the exact amount of space I needed for each frame, and let me know if I would have enough room for them all!
     After the hallway was complete, I moved on to the other walls in the house. We recently got a new couch, which meant rearranging the entire livingroom to accomodate it. This also left me with some blank walls that were behind bookcases before. In case you haven't noticed, I hate blank walls. The drive me crazy! Whenever we move to a new place, getting the walls in order is always my first task!
Look how sad these empty walls are! :(  (Minues the stocking hanger I had up for Christmas!)


The livingroom wall was first since I had an idea of what I wanted to do there! First, I hung the family photos that were hanging in the hallway. These went on the smaller wall. Then I hung the "FAMILY" photosthat used to hang on another wall. I like to use all black frames. This allows me to keep all the frames the same colr, but they can all be a different style. I don't think I have any two frames that are the same, but they are all black. I can also move them if I need to without worrying about messing up any other color scheme. Here it is all finished!
Or so I thought! The FAMILY photos have been giving me some hanging issues for a while now, but I could not find anything to replace them...until after I got all the pictures ready for this post! Here is what it looks like now. Hopefully it will get to stay that way for a while.

Thursday, January 31, 2013

Picture Hanging and Redecorating Part 1

     A few weeks ago, I rearranged most of the walls in our house. This is something I tend to do often. I don't know why. I like my scenery to change, I guess. Maybe that's why I married a military man! ;) I have always been this way. I remember when I was little, I used to always be rearranging my bedroom. It probably drove my mom nuts. I think now I may drive my husband nuts sometimes. I always seem to get the urge to move things (like heavy furniture) when he is away at work. Then, of course, when I get this urge, I can't just sit around and wait until he gets home to help. I have to do it NOW! He has come back home more than once to see things not how they were when he left. This time, it was just things hanging on different walls; no furniture...yet ;)
     We have this wall that greets you when you enter our house. I forgot to take a photo before I took everything down, but I will give you an idea. On this wall, there are things resembling what my husband has done in the Coast Guard. There is no denying when you walk through the door that we are a Coast Guard Family. I really like this wall. But, after staring at it for over two years now, it had to move. So into the hallway it all went! I started by hanging the biggest piece in the center of the wall. I wanted this to be the focal point since I didn't have anything large enough to balance it out.  Here is a somewhat before picture. I thought halfway through that I should take pictures! All the frames are leaning against the wall in the hallway ready to hang!       
     Then, I took all the other frames and traced them. I have seen this done before on nice heavy plain colored paper. Yeah...I didn't have any of that. What I did have was an overload of leftover Christmas wrapping paper. I flipped it to the plain side, traced all the frames, and labeled them so I would know which one I was using, as well as the direction it was supposed to go. Then I got to work arranging them all on the wall!
 I measured where the nails would need to be and nailed right through the paper. Once I was ready to hang, all I had to do was tear the paper down.
 One half done! On to the next!
 I made a bit of a mess. Don't worry, I recycled it all! Could you find my scissors for me please?
 Next half done!
 Here it is all finished. It was hard to get it all in the frame.
 This is from the other side!
    
Now, this was not a blank wall when I started. There were lots of family photos hanging here. guess where they got moved to??
That's right- the living room! I will be sharing another post on how that all turned out! I am so happy I changed everything around! I can't wait to share!!

See you soon!! :)